Axios 教程
axios 引入方式:https://github.com/axios/axios#installing
1、json-server 介绍与服务搭建
json-server 介绍与服务搭建
Get a full fake REST API with zero coding in less than 30 seconds
全局安装:
npm install -g json-server创建一个 db.json 文件
{
  "posts": [
    { "id": 1, "title": "json-server", "author": "typicode" }
  ],
  "comments": [
    { "id": 1, "body": "some comment", "postId": 1 }
  ],
  "profile": { "name": "typicode" }
}
开启服务(在 db.json 所在目录)
json-server --watch db.json访问
http://localhost:3000/posts/1
http://localhost:3000/posts
http://localhost:3000/comments
http://localhost:3000/profile
2、Axios() 函数发送请求
axios :前端最流行的 ajax 请求库,react/vue 官方都推荐使用 axios 发 ajax 请求 ,基于 xhr + promise 的异步 ajax 请求库
axios 函数返回一个 Promise 对象
axios 可以向服务端发送 ajax 请求
在 node.js 中向远端服务发送 http 请求
对应 Restful 风格的 增删改查 基本使用:
<div class="container">
    <h2 class="page-header">基本使用</h2>
    <button class="btn btn-primary"> 发送GET请求 </button>
    <button class="btn btn-warning" > 发送POST请求 </button>
    <button class="btn btn-success"> 发送 PUT 请求 </button>
    <button class="btn btn-danger"> 发送 DELETE 请求 </button>
</div>
<script>
    //获取按钮
    const btns = document.querySelectorAll('button');

    //第一个
    btns[0].onclick = function(){
        //发送 AJAX 请求
        axios({
            //请求类型
            method: 'GET',
            //URL
            url: 'http://localhost:3000/posts/2',
        }).then(response => {
            console.log(response);
        });
    }

    //添加一篇新的文章
    btns[1].onclick = function(){
        //发送 AJAX 请求
        axios({
            //请求类型
            method: 'POST',
            //URL
            url: 'http://localhost:3000/posts',
            //设置请求体
            data: {
                title: "今天天气不错, 还挺风和日丽的",
                author: "张三"
            }
        }).then(response => {
            console.log(response);
        });
    }

    //更新数据
    btns[2].onclick = function(){
        //发送 AJAX 请求
        axios({
            //请求类型
            method: 'PUT',
            //URL
            url: 'http://localhost:3000/posts/3',
            //设置请求体
            data: {
                title: "今天天气不错, 还挺风和日丽的",
                author: "李四"
            }
        }).then(response => {
            console.log(response);
        });
    }

    //删除数据
    btns[3].onclick = function(){
        //发送 AJAX 请求
        axios({
            //请求类型
            method: 'delete',
            //URL
            url: 'http://localhost:3000/posts/3',
        }).then(response => {
            console.log(response);
        });
    }

</script>
3、Axios 对象方法发送请求
<div class="container">
        <h2 class="page-header">其他使用</h2>
        <button class="btn btn-primary"> 发送GET请求 </button>
        <button class="btn btn-warning" > 发送POST请求 </button>
        <button class="btn btn-success"> 发送 PUT 请求 </button>
        <button class="btn btn-danger"> 发送 DELETE 请求 </button>
</div>
<script>
    //获取按钮
    const btns = document.querySelectorAll('button');

    //发送 GET 请求
    btns[0].onclick = function(){
        // axios()
        axios.request({
            method:'GET',
            url: 'http://localhost:3000/comments'
        }).then(response => {
            console.log(response);
        })
    }

    //发送 POST 请求
    btns[1].onclick = function(){
        // axios()
        axios.post(
            'http://localhost:3000/comments',
            {
                "body": "喜大普奔",
                "postId": 2
            }).then(response => {
            console.log(response);
        })
    }
</script>
4、Axios 请求配置
4.1、常用配置
url: 是必须的
url: '/user'请求方式:默认为 GET
method: 'get'headers:设置请求头信息
headers: {'X-Requested-With': 'XMLHttpRequest'},data:请求体
data: {
    firstName: 'Fred'
},
params:传递 url 参数:
params: {
    ID: 12345
},
baseUrl:
baseURL: 'https://some-domain.com/api/',timeout:请求超时时间,超时就取消,单位为 ms
timeout: 1000,responseType:响应结果类型
responseType: 'json', // defaultproxy:代理
proxy: {
    protocol: 'https',
    host: '127.0.0.1',
    // hostname: '127.0.0.1' // Takes precedence over 'host' if both are defined
    port: 9000,
    auth: {
      username: 'mikeymike',
      password: 'rapunz3l'
    }
  },
4.2、设置默认值
<script>
    //获取按钮
    const btns = document.querySelectorAll('button');
    //默认配置
    axios.defaults.method = 'GET';//设置默认的请求类型为 GET
    axios.defaults.baseURL = 'http://localhost:3000';//设置基础 URL
    axios.defaults.params = {id:100};
    axios.defaults.timeout = 3000;

    btns[0].onclick = function(){
        axios({
            url: '/posts'
        }).then(response => {
            console.log(response);
        })
    }

</script>
5、Axios 实例对象发送请求
<script>
    //创建实例对象  /getJoke
    const test = axios.create({
        baseURL: 'https://api.apiopen.top',
        timeout: 2000
    });

    const onather = axios.create({
        baseURL: 'https://www.bilibili.com',
        timeout: 2000
    });

    //这里  test 与 axios 对象的功能几近是一样的
    test({
        url: '/getJoke',
    }).then(response => {
        console.log(response);
    });

    onather.get('/getJoke').then(response => {
        console.log(response.data)
    })
</script>
6、Axios 配置拦截器
使用介绍:https://github.com/axios/axios#interceptors
① 请求拦截器:
通过回调对请求的参数等进行校验等功能
② 响应拦截器:
通过回调函数对结果进行预处理
<script>
    // Promise
    // 设置请求拦截器  config 配置对象
    axios.interceptors.request.use(function (config) {
        console.log('请求拦截器 成功 - 1号');
        //修改 config 中的参数
        config.params = {a:100};
        return config;
    }, function (error) {
        console.log('请求拦截器 失败 - 1号');
        return Promise.reject(error);
    });

    axios.interceptors.request.use(function (config) {
        console.log('请求拦截器 成功 - 2号');
        //修改 config 中的参数
        config.timeout = 2000;
        return config;
    }, function (error) {
        console.log('请求拦截器 失败 - 2号');
        return Promise.reject(error);
    });

    // 设置响应拦截器
    axios.interceptors.response.use(function (response) {
        console.log('响应拦截器 成功 1号');
        return response.data;
        // return response;
    }, function (error) {
        console.log('响应拦截器 失败 1号')
        return Promise.reject(error);
    });

    axios.interceptors.response.use(function (response) {
        console.log('响应拦截器 成功 2号')
        return response;
    }, function (error) {
        console.log('响应拦截器 失败 2号')
        return Promise.reject(error);
    });

    //发送请求
    axios({
        method: 'GET',
        url: 'http://localhost:3000/posts'
    }).then(response => {
        console.log('自定义回调处理成功的结果');
        console.log(response);
    });
</script>
执行顺序:请求拦截器 2,请求拦截器 1,响应拦截器 1,响应拦截器 2
7、Axios 取消请求
https://github.com/axios/axios#cancellation
const controller = new AbortController();

axios.get('/foo/bar', {
   signal: controller.signal
}).then(function(response) {
   //...
});
// cancel the request
controller.abort()
8、Axios 源码分析
axios.js
'use strict';
// axios 入口文件
//引入工具
var utils = require('./utils');
//引入绑定函数  创建函数
var bind = require('./helpers/bind');// 创建函数的
//引入 Axios 主文件
var Axios = require('./core/Axios');
// 引入合并配置的函数
var mergeConfig = require('./core/mergeConfig');
// 导入默认配置
var defaults = require('./defaults');

/**
 * Create an instance of Axios
 * 创建一个 Axios 的实例对象
 * @param {Object} defaultConfig The default config for the instance
 * @return {Axios} A new instance of Axios
 */
function createInstance(defaultConfig) {
    //创建一个实例对象 context 可以调用 get  post put delete request
    var context = new Axios(defaultConfig);// context 不能当函数使用
    // 将 request 方法的 this 指向 context 并返回新函数  instance 可以用作函数使用, 且返回的是一个 promise 对象
    var instance = bind(Axios.prototype.request, context);// instance 与 Axios.prototype.request 代码一致
    // instance({method:'get'});  instance.get() .post()
    // Copy axios.prototype to instance
    // 将 Axios.prototype 和实例对象的方法都添加到 instance 函数身上
    utils.extend(instance, Axios.prototype, context);// instance.get instance.post ...
    // instance()  instance.get()
    // 将实例对象的方法和属性扩展到 instance 函数身上
    utils.extend(instance, context);

    return instance;
}
// axios.interceptors

// Create the default instance to be exported
// 通过配置创建 axios 函数
var axios = createInstance(defaults);

// Expose Axios class to allow class inheritance
// axios 添加 Axios 属性, 属性值为构造函数对象  axios.CancelToken = CancelToken    new axios.Axios();
axios.Axios = Axios;

// Factory for creating new instances
// 工厂函数  用来返回创建实例对象的函数
axios.create = function create(instanceConfig) {
    return createInstance(mergeConfig(axios.defaults, instanceConfig));
};

// Expose Cancel & CancelToken
axios.Cancel = require('./cancel/Cancel');
axios.CancelToken = require('./cancel/CancelToken');
axios.isCancel = require('./cancel/isCancel');

// Expose all/spread
axios.all = function all(promises) {
    return Promise.all(promises);
};
axios.spread = require('./helpers/spread');

module.exports = axios;

//简单实现全局暴露 axios
window.axios = axios;

// Allow use of default import syntax in TypeScript
module.exports.default = axios;
axios运行的整体流程:
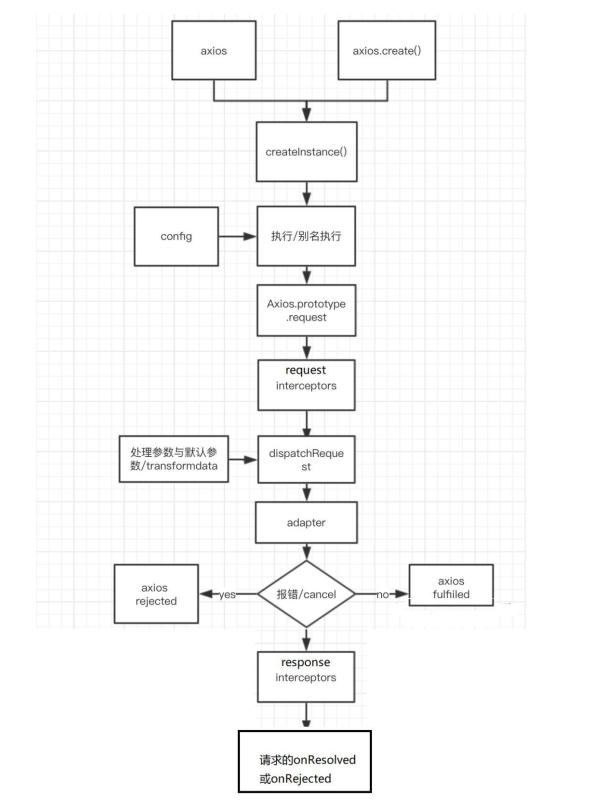
request(config) ==> dispatchRequest(config) ==> xhrAdapter(config)
request(config):
将请求拦截器 / dispatchRequest() / 响应拦截器 通过 promise 链串连起来,
返回 promise
dispatchRequest(config):
转换请求数据 => 调用 xhrAdapter()发请求 => 请求返回后转换响应数
据. 返回 promise
xhrAdapter(config):
创建 XHR 对象, 根据 config 进行相应设置, 发送特定请求, 并接收响应数据,
返回 promise